Configuration: Integration

On this page it is possible to configure how the application should be integrated to the system. Only advanced users should use these options and features.
Protection
The software can be protected by a password. Without knowing this password, the user is not able to examine and modify the current settings. Optionally the main information window can be protected also, so it is not possible to view hard disk details without the password.
When protection is enabled, the administrator can access the corresponding window after entering the correct password. The software remembers the password after closing the information or the configuration window, the user does not need to enter it again – except if the automatic log out option is enabled. This case after the specified time out value expired, Hard Disk Sentinel will ask for the password again.
System administrator can use Log out now button any time to log out after verification and modification of settings. This protects the user interface again with password.
Note: This function is available only in the registered version.
Service
Hard Disk Sentinel can work in two different modes. It can run as Application or Service. By default, it runs in Application mode: the software starts after the user (with proper administrator rights) logs in. Before version 2.02 this was the only mode.
When running Hard Disk Sentinel as NT Service, the software starts with the operating system and runs even if no user logged in or if a user has only limited rights. This way Hard Disk Sentinel works independently from the current user: it can control and verify hard disk status, start backup operations – just like the other mode.
Only the system administrator can install, uninstall and manage services. So the administrator should configure the application (for example, set thresholds, alarm options) and then switch to Service mode. It is recommended to use the previous (Protection) feature also to prevent unauthorized changes in configuration.
Notes about the service mode:
-
This feature is available only on NT based operating systems (Windows 2000, XP, 2003, Vista).
-
The software performs same functionality in service mode and application mode.
-
The name of the service is: HardDiskSentinelService, and runs in security context of “Local system”. Administrator can change this by using Control Panel, Administrative Tools, Services window if needed (for example to enable access of remote drives and resources). The configured backup projects and external applications inherit the specified rights.
-
The service can be started and stopped from the Hard Disk Sentinel program group by using the proper shortcut. After stopping the service, it is possible to completely remove it and switch back to application mode. The user needs to have administrator rights and needs to enterthe correct password to do this (if the Protection feature was enabled).
-
It is possible to use the software in an “invisible” mode (without displaying windows, tray icons, messages) if the “Allow service to interact with desktop” option is disabled (in the “Service properties” window of the operating system). In this case the user is not able to access the main information and the configuration windows – unless he stops the service by using the “Stop service” shortcut. Windows Vista does not display any user interface for interactive services, so Hard Disk Sentinel service runs in such “invisible” mode under Vista.
-
When using the software in service mode, the “update” function is not available and the software cannot be closed. It should be stopped by the shortcut from the Hard Disk Sentinel group.
-
The service stops and starts automatically with the system, the user does not need to manually stop it before shutting down the computer.
-
The administrator should disable the access of Hard Disk Sentinel folder for users with limited rights. This way users will not be able to examine and modify settings and information outside the application.
-
Some systems, applications or desktop themes may cause that some parts of the user interface (status window, information on dekstop) are not or partially displayed.
-
When the automatic updater is used to update from version 2.00 or previous, the “Start service” and “Stop service” shortcuts are not available in Hard Disk Sentinel program group. It is recommended to install version 2.05 (or later) manually to create these shortcuts.
-
It is possible to Start and Stop the service by using the Control Panel, Administrative Tools, Services window. Right click on HardDiskSentinelService and a popup menu will appear with Start and Stop commands. This is also possible from a remote computer if the user has the proper rights.
-
When the service is stopped, it is possible to install or uninstall the service by using HDSentinel.exe /INSTALL or HDSentinel.exe /UNINSTALL commands in Hard Disk Sentinel installation folder.
Remote Control
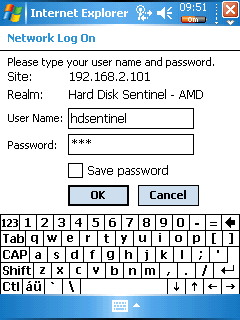
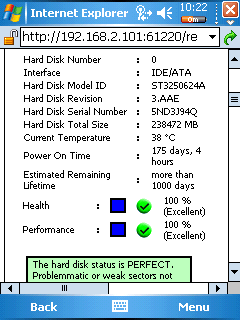
Enable WebStatus: if enabled, it is possible to examine hard disk status from the local or a remote computer/mobile phone/PDA by using a web browser. Optionally a password can be used to prevent unauthorized access. This way any user name and the Password on the Protection panel should be used to make the connection.
It is possible to specify any HTTP port, according to the current network configuration.
Note: this function is available only in the registered version.
When this option is enabled, the following queries can be used in the web browser:
- http://server:port/status : the entire status window with all contents (exactly as configured), which is periodically updated after the specified time elapsed. The window has no borders and margins and it can be inserted into an IFRAME.
- http://server:port/statuswin.bmp : status window (image only)
- http://server:port/report : detailed HTML report which contains the configured report sections
- http://server:port/xml : complete XML report
Note: the status window does not need to be displayed on the computer (server) to use this feature.
For example: if the option is enabled on the local computer and the default settings are used, enter http://localhost:61220/status into a browser to examine hard disk information.
Notes: all requests are logged with IP and date to “NetLog.txt” file. Queries other than the above returns 403 Forbidden error in the browser. It is NOT possible to access the file system or any other information by this feature.
Note: if the computer (server) has dynamic IP address, it is required to use the service of a dynamic DNS provider (translating the dynamic IP address to a fix host name) to remotely access the computer. This service is available freely on (for example) http://www.no-ip.com and http://www.dyndns.com .


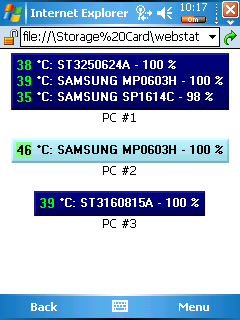
Hard Disk Sentinel status windows from two or more computers can be easily combined into a single webpage (which is automatically updated to reflect the current status). This way it is possible to examine the status of different configurations remotely by opening this page (HTML file, which can be on a file server on the network or on the PC/phone/PDA itself) in a browser. Examples:
<html> <head> <title>Hard Disk Sentinel Status</title> </head> <body> <center> <iframe src="http://d2nwkt1g6n1fev.cloudfront.net/helpmax/wp-content/uploads/sub/harddiscsentinel/en/source/http://192.168.2.101:61220/status" width=220 height=61 frameborder=0></iframe><br>PC #1<br><br> <iframe src="http://d2nwkt1g6n1fev.cloudfront.net/helpmax/wp-content/uploads/sub/harddiscsentinel/en/source/http://192.168.2.102:61220/status" width=220 height=61 frameborder=0></iframe><br>PC #2<br><br> <iframe src="http://d2nwkt1g6n1fev.cloudfront.net/helpmax/wp-content/uploads/sub/harddiscsentinel/en/source/http://192.168.2.103:61220/status" width=220 height=61 frameborder=0></iframe><br>PC #3<br><br> </body> </html>
<html> <head> <title>Hard Disk Sentinel Status</title> <META HTTP-EQUIV="Refresh" CONTENT="300"> <META HTTP-EQUIV="Pragma" CONTENT="no-cache"> <META HTTP-EQUIV="Expires" CONTENT="-1"> <META HTTP-EQUIV="CACHE-CONTROL" CONTENT="NO-CACHE"> </head> <body> <center> <a href="http://192.168.2.101:61220/report"><img src="http://d2nwkt1g6n1fev.cloudfront.net/helpmax/wp-content/uploads/sub/harddiscsentinel/en/source/http://192.168.2.101:61220/statuswin.bmp" border=0></a><br>PC #1<br><br> <img src="http://d2nwkt1g6n1fev.cloudfront.net/helpmax/wp-content/uploads/sub/harddiscsentinel/en/source/http://192.168.2.102:61220/statuswin.bmp"><br>PC #2<br><br> <img src="http://d2nwkt1g6n1fev.cloudfront.net/helpmax/wp-content/uploads/sub/harddiscsentinel/en/source/http://192.168.2.103:61220/statuswin.bmp"><br>PC #3<br><br> </body> </html>

Accept remote connections from server: Hard Disk Sentinel Enterprise can be used to remotely analyse hard disk problems, verify hard disk status and test hard disks on computers running the Hard Disk Sentinel client. If this option is enabled, the server can send commands and detect information about this computer.
Enable DynDNS, No-IP or Custom Dyamic DNS service: by using these services, it is possible to assign a fix host name to a changing (dynamic) IP address of a computer. With this constant host name, the computer could be accessed remotely, so remote management (webstatus, remote connections) is possible.
To configure this, a registration at one of the above services is required. Then the username, password and the registered host name should be configured in Hard Disk Sentinel. Later, when the application detects that the IP address of the computer is changed, it will automatically update the it for the associated host in 1 minute. This way the remote access would be possible after the computer re-connects the network.
The “Configure” button should be used to specify the username, password and host name for the specific dynamic DNS provider. After an IP update, the last server response can be checked by moving the mouse cursor over the corresponding Dynamic DNS option. This server response is useful to diagnose any problem (for example incorrect username).